
End-to-end (E2E) testing is a full-proof method that ensures an application’s workflow works as intended from start to finish. It tests the integration and interaction of different components, thus finding system modules and data connections dependency. End-to-end testing becomes a very efficient detection method for defects not identified by unit or functional testing, ensuring the expected quality of an application through these stages, which simulate the user environment.
Introducing Playwright
Playwright, which was developed by Microsoft, is a solid open-source framework that is used for web testing and automation. It offers major programming languages like JavaScript, TypeScript, Python, .NET, and Java, and it is suitable for all the major browser engines such as Chromium, Firefox, and WebKit. Playwright’s capabilities include handling modern web features such as native input events, out-of-process iframes, and web workers that make it a versatile E2E testing tool.
Key Features of Playwright:
- Supports Chromium, Firefox, and WebKit.
- Allows test scripting in JavaScript, TypeScript, Python, .NET, and Java.
- Enables parallel test execution via BrowserStack for efficiency.
- Works with multiple Chrome, Edge, and Playwright browser versions on Windows and macOS.
- Captures videos, screenshots, and logs on failure for easy debugging.
- Offers various element selectors like CSS, text, and XPath element.
- Uses auto-wait to ensure elements are ready before interaction.
- Includes Codegen to generate test scripts from user actions (playwright codegen URL).
- Supports selecting/writing elements via the text content and accessibility labels.
- Handles shadow DOM, geolocation, permissions, web workers as well as modern web APIs.
- Supports native input events, iframes, file handling, as well as dark mode.
What is End-to-End Testing?
End-to-end (E2E) testing is a type of software testing that is all about making sure that an app’s entire workflow is working correctly from start to finish. It examines the system dependencies, the behavior of the data, and the correspondence between the components. This is relayed through the application to various servers and databases, so it is always good to run a test to see if all those connections are working properly. It’s all about the user’s perspective, and the main purpose is to make sure that anything and everything on the site and peripheral is working as required.
What is Playwright End-to-End Testing?
Playwright E2E testing lets developers and QAs simulate real user interactions, like clicking buttons, filling out forms, and navigating pages. It automates testing across browsers like Chrome, Firefox, Safari, and Edge, ensuring that expected behaviors work correctly.
Step 1 — Setting up a React demo project
- Start by cloning the TodoMVC qaOntop React application repository to your local machine:

Once you have cloned it, you should go to the project directory and then install the dependencies that are required:

This step guarantees the availability of all required libraries and tools for the development server. When done with the installation, you shall be able to initiate the server using this command:
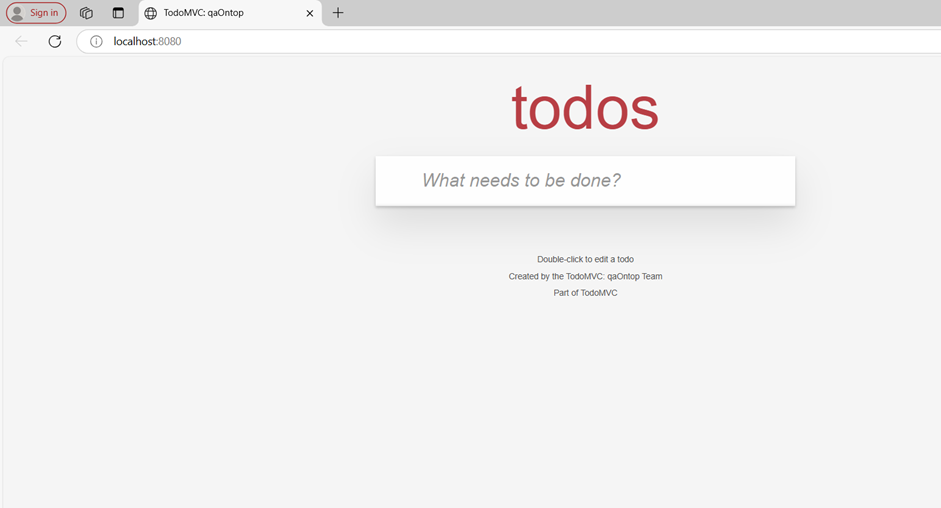
The server will initialize and listen on port 8080. The output will resemble:

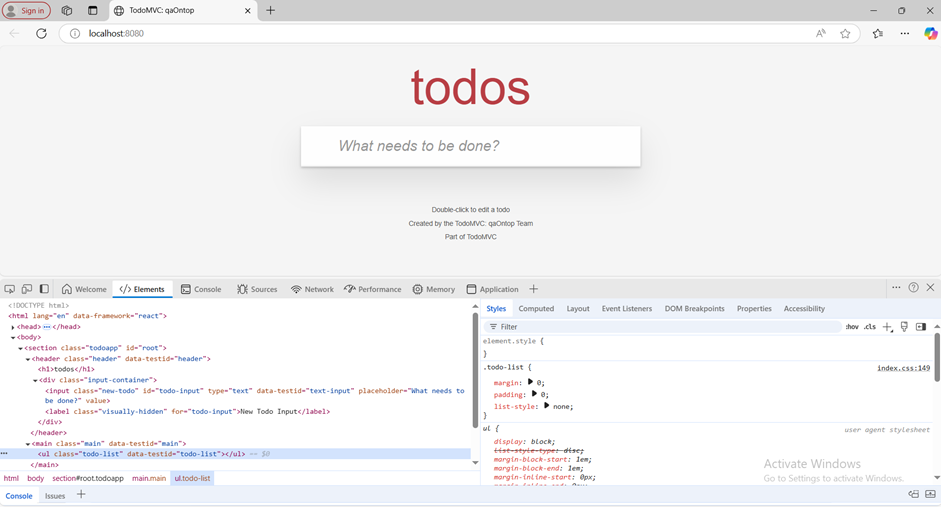
For the application to run perfectly, open http://localhost:8080 in your web browser. You should be able to see the TodoMVC application interface. In order to check, add several items to the tasks list and make sure that the application behaves as it should.
With Playwright, you create tests to confirm the principal functions of the app, meaning features like the ability to add and manage to-do items. These tests will validate Playwright as the fastest and simplest way automated browser testing is done.
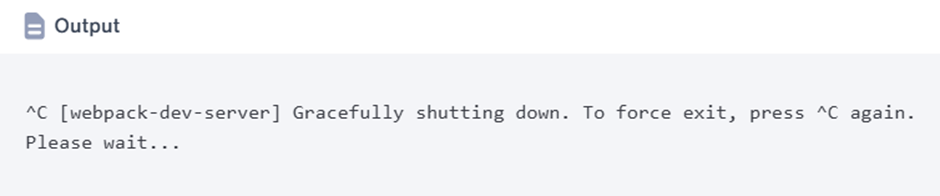
On completion of the recent task, shut down the development server. Terminate the server by pressing Ctrl-C in the terminal where the server is running. The server will then shut down properly:
Now that the demo project is set up, you’re ready to integrate and configure Playwright for writing and running end-to-end tests.
Step 2 — Setting up Playwright
The next part is the installation of Playwright to your project and setting up the browser engines necessary for end-to-end testing.
To start, make Playwright a part of your project. For this, execute the command below from the root directory of your project:

During the installation, you’ll be prompted to make several selections. Choose as follows for this tutorial:

Once you’re done with this, you’ll be greeted by a message that states the installation is finished and that the playwright and his dependencies are now a part of your project.
Next, let’s configure Playwright to suit our testing requirements. Open the playwright.config.js file, which was created during the installation, in your preferred text editor:


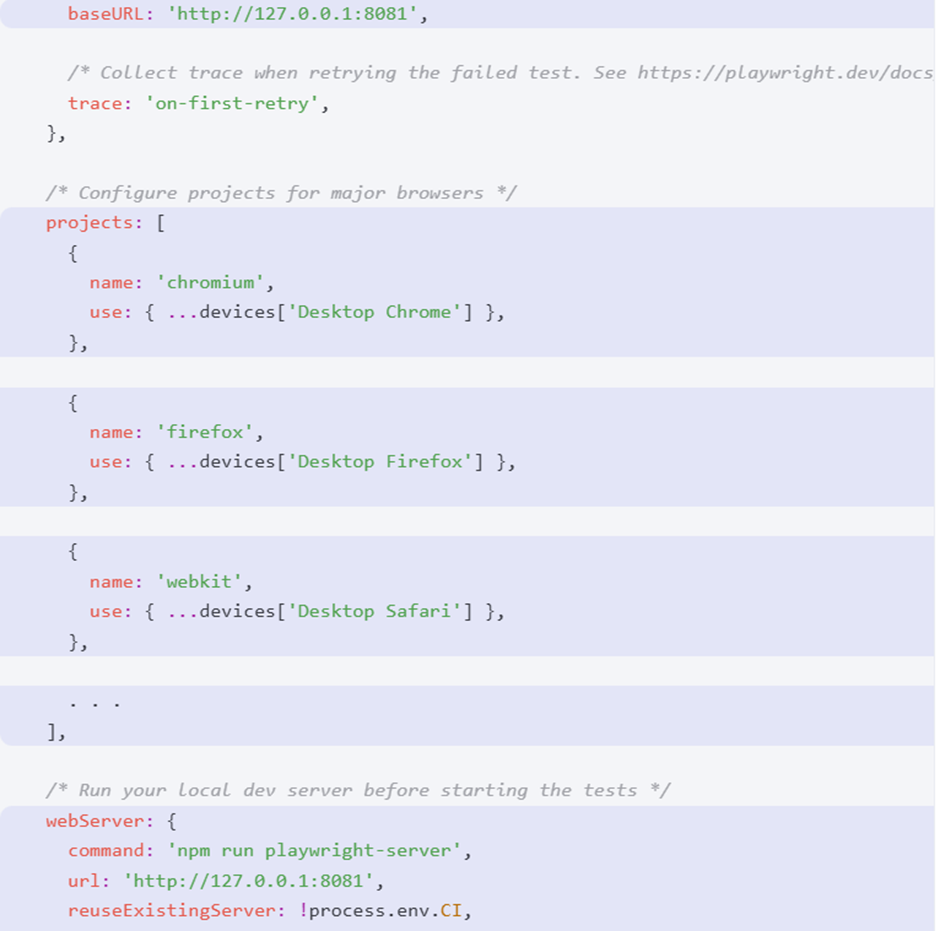

One of the main features of the Playwright tool is that users can easily customize their tests. Below are the most important of these features that I talked about in the tutorial:
- testDir: This option specifies the ./tests directory where one can place all the test files.
- projects: It sets the targets to the browsers to be used in the testing process (Chromium, Firefox, WebKit).
- webServer: If you choose Playwright, you can start a local server in your development environment before your test runs. The command property is the shell command that will be executed, and the URL is the root URL of the server after the launch. Read the docs to know more about the available configuration options.
- use.baseURL: By this way, you’re telling the server the URL of your application root. The use of this feature allows you to see only the relative paths that the test scripts use; they won’t be written as full URLs.
Before the implementation of the playwright script, the package.json file should be created as follows:
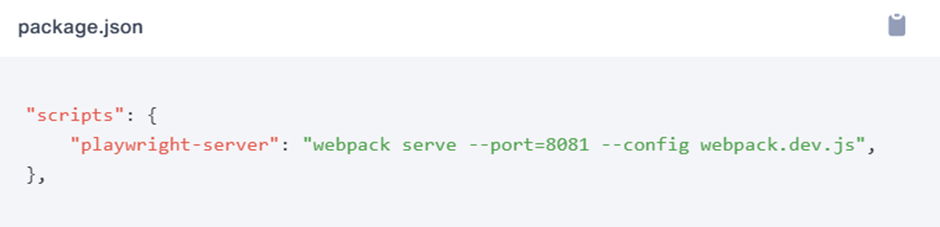
The script included in this section will create a server configured for Playwright tests with a different port.
Having Playwright installed and set up on any platform is enough to start the writing of your first test script.
Step 3 — Writing your first test
The playwright created a tests directory containing an example test file in the previous step. Start by removing this example:

Next, create a new test file specifically for your To-do application. This novel test file will create a test that will investigate the application’s state from the beginning. The idea is to validate that when restarting the window, there will be no tasks to be listed, and the input field is in focus.
Feel free to write the code that meets these requirements:
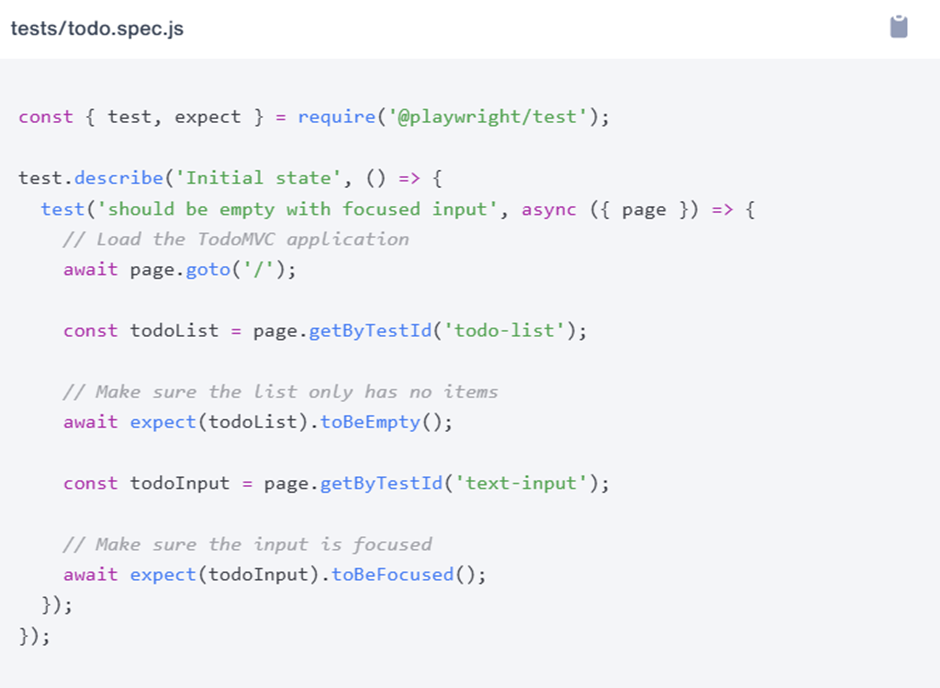
The playwright’s test and expect functions are the tools for defining the test and making assertions, respectively. The describe() method, on the other hand, is for grouping related tests and stating clearly what the test suite is about.
In the block of code for the inward describe function, the test() element gives a specific heading to a test case and demonstrates the empty state of a to-do list and the input’s selection.
It will then go to the TodoMVC app by clicking on the http://localhost:8081link. after that,it uses a getByTestId() locator to find elements by data-testid attributes.
The expect() function is subsequently employed to assert that the to-do list is empty and the input field is focused.
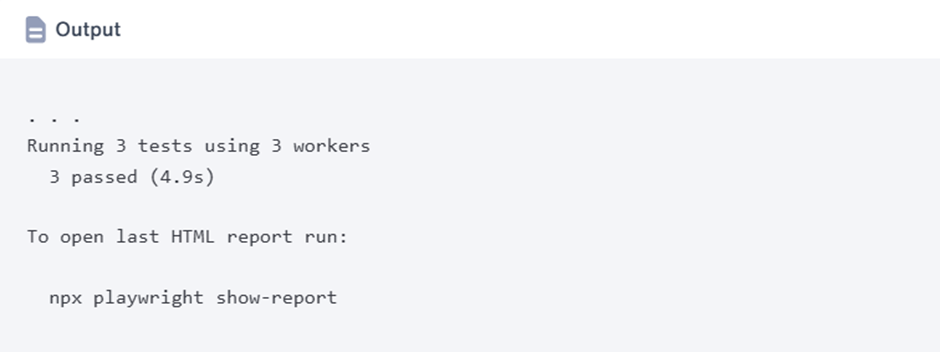
To run your test, execute the following command in your terminal:

By using this command, you are starting the development server and having the tests run on different browsers as specified in the playwright.config.js file. To confirm whether the application you are developing behaves as it should in the initial state, all tests must be passed by your browser for the desired results.
The section coming up will cover the testing of more sophisticated user interactions now that the application’s initial behavior has been confirmed. In addition, you’ll be exploring how Playwright’s UI mode can help in the understanding and debugging of these interactions.
Step 4 — Exploring Playwright’s UI mode
In this part of the tutorial, you’ll create a test to confirm that items can be successfully added to the to-do app and use Playwright’s UI mode to visualize and debug the test execution.
First, update your todo.spec.js file to include a new test:
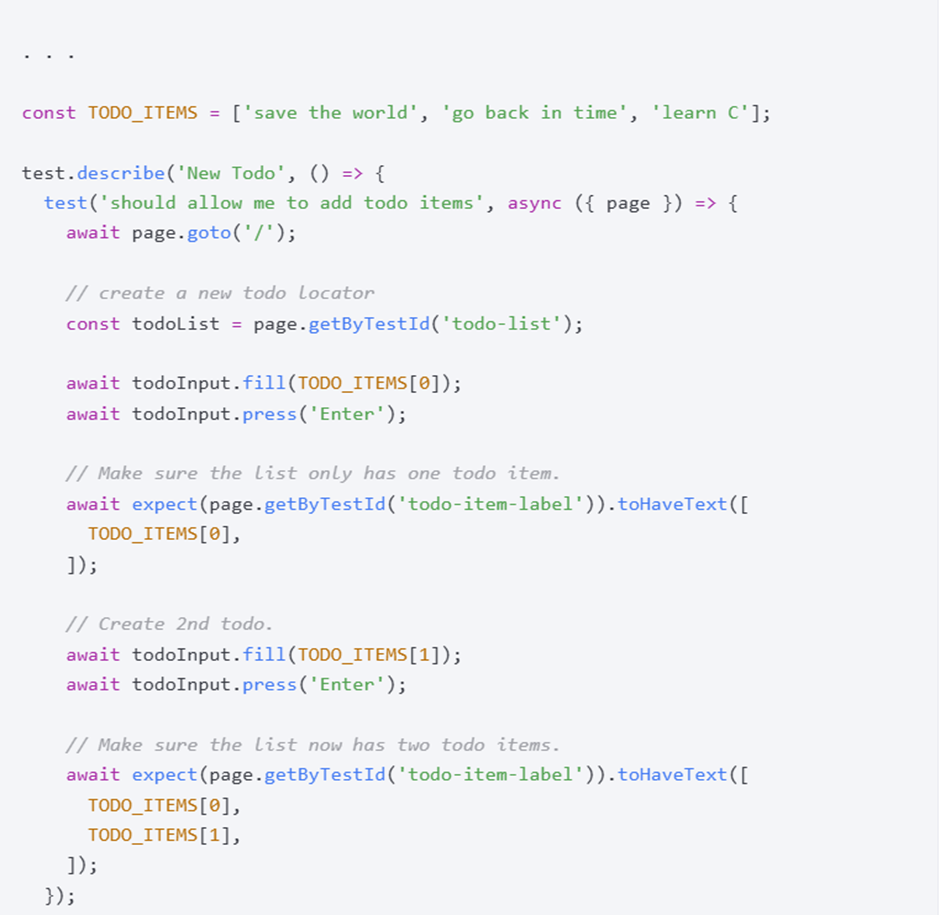
This test is a way to check if users can add items to the to-do list and ensure that the list updates successfully.
The application loads by typing in the input field for new to-dos using its data-testid and then follows in different stages:
- The first item in the TODO_ITEMS array is entered into the input field, and the Enter key press is simulated.
- Verifying the list for its presence of only the first item comes next in the to-do list.
- The second item from the list of to-do items is entered like the first one.
- Next, the to-do list is checked again to ensure that it contains both the first and second items
To observe how the test runs, use the following command

When you execute this command, either the Playwright’s UI mode window will be open. This tool lets you interactively step through tests so that you can visually inspect the DOM at different steps, you can view the timeline of test executions, and analyze the action, log, and error in real time. By making it simpler for you to understand, debug, and refine your test scripts, this characteristic of the feature greatly betters the end-to-end testing experience.
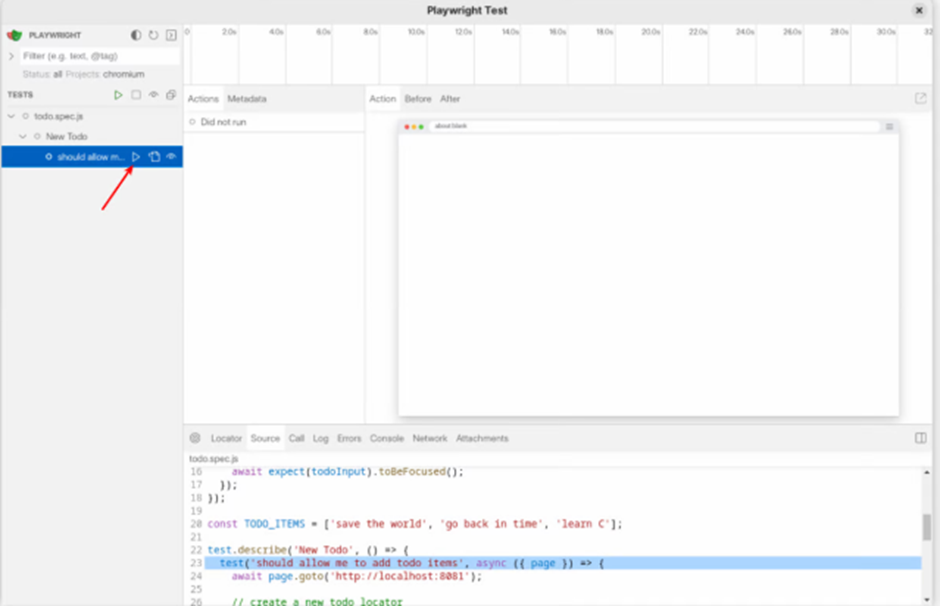
There is a pause in the testing done when the UI mode is activated, initially. The resume button (click on the Play icon next to the test title) is available to continue the process. The test should go on performing the tasks and finish them without making any mistakes.

At the top of the trace, you’ll see a timeline of the test execution. You can hover on any portion of the timeline to see a snapshot of the test or select between two points to filter only the actions and logs for that portion of the test.

The Actions tab shows all test actions with their locators used and the time it took for them to run. By clicking on these actions, their changes can be seen. Furthermore, you can see the application state before and after an action via the Before and After tabs.

If you want to inspect the DOM at any stage of testing, then you will have to click the external link icon positioned on the top right of a DOM snapshot. When you do this, a new window will appear with DevTools settings that will help you examine the problem and be able to correct it.

Below the DOM snapshot, several tabs provide additional information:
- Locator: Used to select locators from the DOM snapshot that can subsequently be copied into the test script.
- Source: Shows the code for the highlighted action.
- Call: Displays timing and locator details.
- Log: Contains internal Playwright logs.
- Errors: List any errors encountered during the test.
- Console and Network: Show application logs and network requests.
- Attachments: Useful for visual comparisons in regression testing.
To debug and understand the Playwright script behavior more effectively, through the usage of these features, is the way to be sure that they will test the application’s correct functionality.
Step 5 — Detecting visual regressions with Playwright
Visual regression testing aims at locating those inadvertent changes in the visual form of a program. It is a comparison of the current visual settings of all the elements or screens in an application against a bunch of individual images taken before, which is done to ensure that every element in UI renders as it should across various browsers and coding changes.
Playwright provides a comfortable way of checking for visual regressions in your applications by following this general process:
- Initially, it sets up a collection of images that shows the normal state of the UI elements or pages. Later on, these pictures are the basis for the next comparison.
- Then, it takes the status of the UI during the test run.
- It will then contrast these images with the reference. Any mismatches are identified as potential regressions, which could stem from CSS modifications, layout, JavaScript updates, or browser behavior.
Under the hood, Playwright uses the pixelmatch library, a pixel-level image comparison library. When running a visual regression test for the first time, it generates and saves a reference screenshot as the baseline.
Let’s see this in action by adding the following test to your todo.spec.js file:
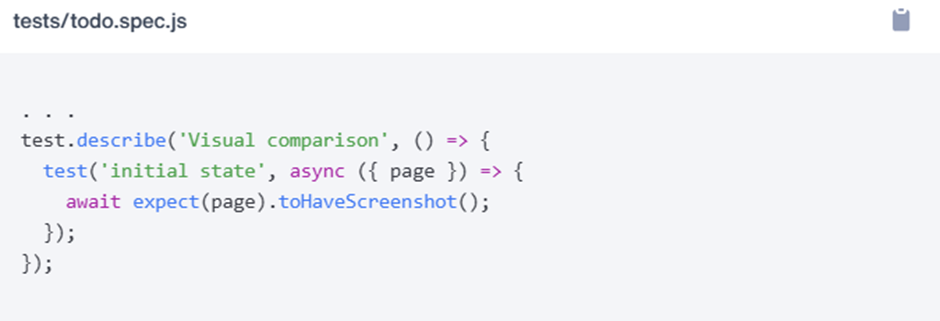
This test uses the toHaveScreenshot() method to capture and compare the current state of the page with the expected baseline image.
Before you execute the test, refactor the test script as shown below:
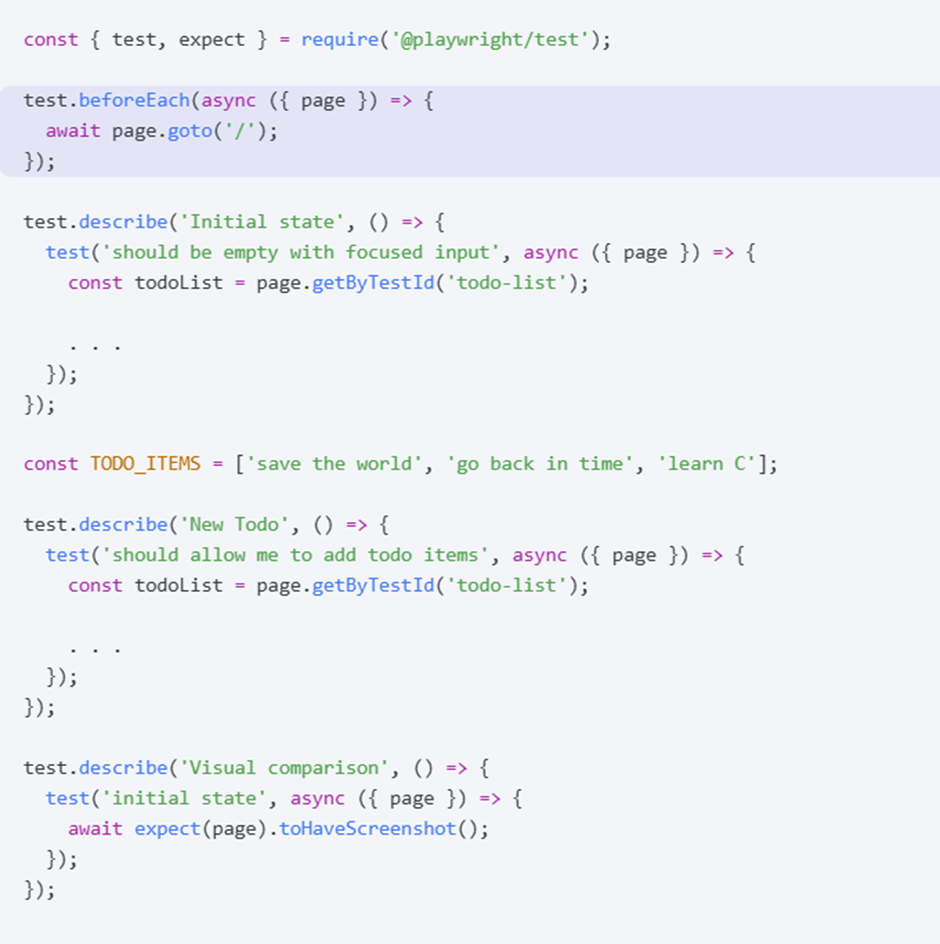
The beforeEach() hook is a directive that a page should be tested. It should be added to a test script page via this line: The beforeEach() hook is a directive that ensures that the page is ready before each test is performed. This will ensure well-organized test scenarios and make sure that the test events will have the correct preconditions before being executed.
Next, go to the command line to run the Visual comparison suite with the command that follows:

Initially, the test will fail due to the absence of a baseline image, commonly known as a “golden file“. This failure is expected and part of establishing your initial baseline.
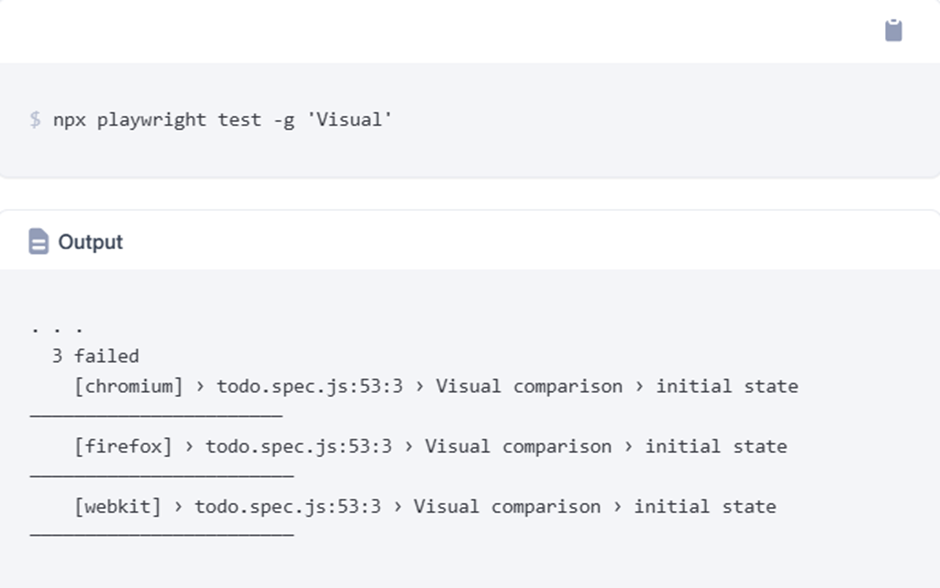
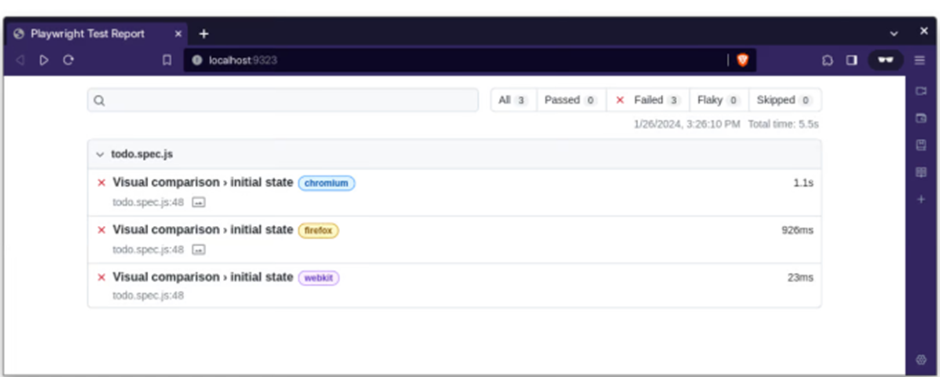
By running the command, an HTML error report will open in your default browser, displaying the failure of the test in all browsers. Such a failure is due to missing baseline images to which comparisons can be made. The report will be a part of a Screenshots section that will contain screenshots of the captured images for viewing.These initial screenshots are the reference images that are saved within your tests directory as follows:
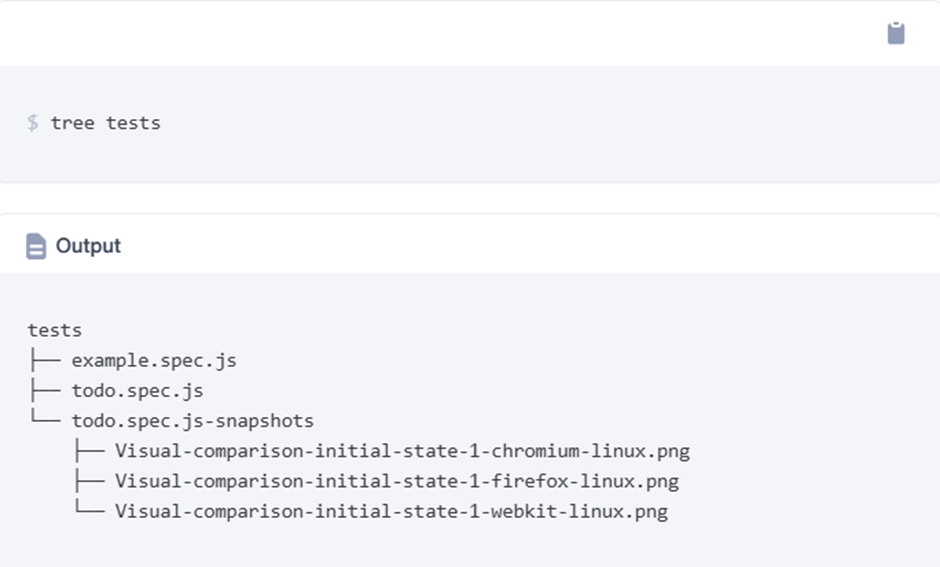
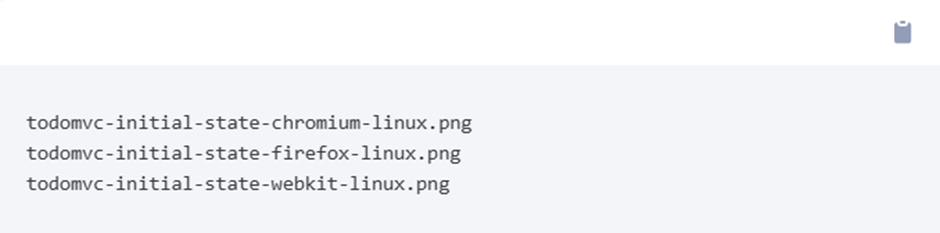
Each reference file’s name is a series of the suite name, test name, browser engine, and platform, all concatenated. Moreover, by passing an argument to toHaveScreenshot(), you can also custom-create a screenshot name:

This will yield file names such as:
As soon as you have a Playwright setup running, which means an initial screenshot is established, every time you run a test it will compare the one captured from the UI with this baseline reference.
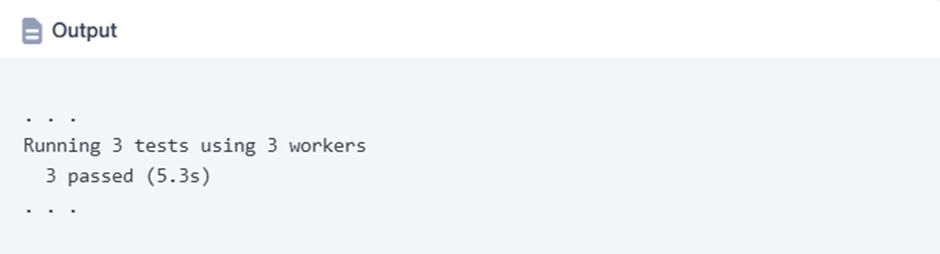
Stop the HTML report server by pressing Ctrl-C, then execute the visual regression test again in the same way as follows:

You should see a successful test run, indicating no visual discrepancies:
For showcasing Playwright’s ability to create visual regression reports, you may want to affect the change of a small part of your app. For instance, change the color of a header element in the file called header.jsx:
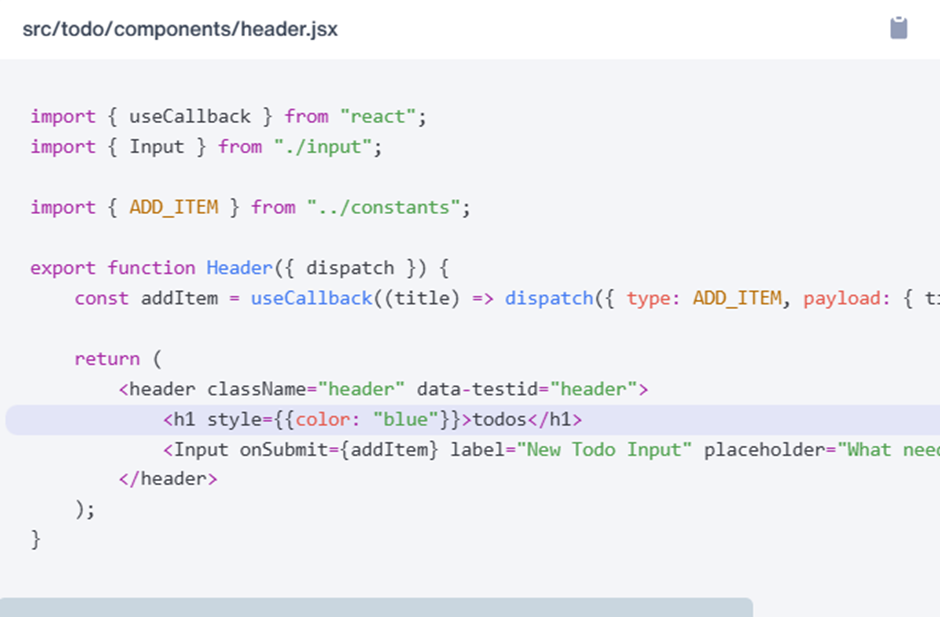
The header’s text color of the blend between beta and blue has been modulated, trying to resemble a meander’s color change.
Perform the visual regression test again:

This time, expect the test to fail as the UI’s current state deviates from the baseline:
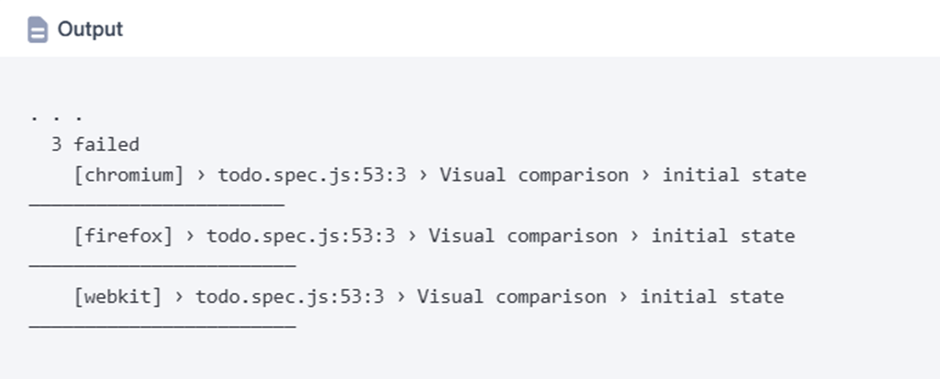
When the anyhow test fails, the report pops up in your browser and then shows the specifics:

Open any of the failed items and slide down to the Image mismatch section to contrast the new screenshot and the reference.
- Diff delineates the changed areas with red,
- Actual shows the latest snapshot,
- Expected shows the original screenshot,
- Side by side shows the expected and actual results side by side,
- The slider affords a fun, interactive method of finding the differences by dragging a slider.
Dealing especially with a test problem, the fundamental rules boil down to the following two:
- Accidental modifications: When you find out that the appearance has changed without your intention, you should find the cause of the problem and then change or fix the code until everything passes the test.
- Planned upgrades: When the system is fixed, users should use the sikuli-click command to get the new reference screenshot for the page where the changes happened, as follows:

It regenerates the baseline images, aligning them with the new visual state of your application:

When the basic images are updated, the assessments will pass, showing the new approved condition of the UI. The corrected screenshots are then saved to the source control to become the new reference for future tests.
Final thoughts
In this article, you have seen how to write, run, and debug end-to-end tests for a React app using Playwright. We also talked about the role of regression testing in preserving the visual consistency of application frontends and showed how these tests can be implemented efficiently.
.
For further details and expert QA solutions, visit qoantop—your go-to partner for smooth and high-quality software testing.
Thanks for reading, and stay tuned!